Why Gradle is loathed while actually being great!

Gradle is a misunderstood gem. Most people using Gradle did not choose to use it and were forced into it by the toolchain of whatever platform they wanted to work with (Android, Jetbrains IDEs, nearly all Kotlin projects…). Hence, there seems to be lots of Gradle hate going around.
This disturbs me (in a weak sense, like people flashing bare ankles on a freezing day disturb me) because I find Gradle to be one of the greatest tools available to build things. That is perhaps the result of coming to it by choice, after having suffered for years at the hands of XML-heavy tools like Ant and, later, Maven. Add to that an inevitable but unhealthy dose of bash scripts and Make files, and building software had been a tough call for me before I met Gradle.
In this post, I will try to convince you, the reader, that Gradle is, in fact, a great piece of software that can be used to build nearly any software in a quite elegant manner, despite the best efforts by plugin authors and Gradle, the company, to pile up layers upon layers of complexity and configuration options over the years in the name of pursuing infinite flexibility and, of course, ensuring newcomers’ claims at being better at any particular thing, no matter how irrelevant, shall not go unchallenged.
To convince you, though, I need to show you how Gradle really works.
Gradle as a task runner
In its core, Gradle is a simple task runner. This is what it does best, and to use it as such is extremely easy, as we’ll see.
By convention, a Gradle builde file is called build.gradle.
The syntax used in a .gradle file is, by default, from the Groovy programming language.
Gradle files can also be written in Kotlin, but as for most of its history Gradle used only Groovy, most examples you’ll find online, and most real world projects still use Groovy, so I’ll only show Groovy examples. Notice that the Kotlin DSL is nearly identical, so it should be easy to follow this post using Kotlin if you prefer.
Many people think of Groovy as a dynamic Java, which is a mostly accurate, but far from complete view… Groovy has a lot of features that were taken from other dynamic languages, including Python, Ruby and Smalltalk, but it also supports static types!
That is, however, a story for another time… suffice to say that you don’t need to write code that resembles Java code even from a mile away in Gradle files.
Here’s an example of a “build file” to create a text file containing the text ‘Hello World’:
def helloFile = file('hello.txt')
task createHelloWorld {
    outputs.files(helloFile)
    doLast { helloFile.write('Hello world') }
}
The body of task blocks is used to configure the task, and it runs on every build. That’s why we must put any
code we want to execute when the task actually runs inside a doLast (or doFirst) block.
To run this task, execute the following command:
$ gradle createHelloWorld
Starting a Gradle Daemon (subsequent builds will be faster)

BUILD SUCCESSFUL in 3s
1 actionable task: 1 executed
You should find the hello.txt file next to the build.gradle file even if you run it from another directory,
as the function file('filename') always resolves paths relative to the project directory, not the working directory.
You can try to run it from another directory to confirm by pointing out the build file location with the -b option:
$ cd ..
$ gradle -b gradle/build.gradle createHello

BUILD SUCCESSFUL in 693ms
1 actionable task: 1 up-to-date

$ ls gradle
build.gradle hello.txt
Notice that Gradle allows you to shorten task names by using only the first letters of each word in its name,
so running gradle createHello also works (or even gradle cH as long as it’s not ambiguous).
In the example above, you can see that Gradle did not really execute the task the second time as it was up-to-date!
That’s because we told Gradle the output of the task, so it knows that as long as the file has not been modified, it doesn’t need to run the task again.
Even if you run touch hello.txt Gradle won’t run the task again because it actually checks the hash of the file to
know if it has actually changed, rather than only checking its timestamp.
You can display which tasks are being executed with the --console=plain option:
$ touch hello.txt
$ gradle cH --console=plain
> Task :createHelloWorld UP-TO-DATE

BUILD SUCCESSFUL in 639ms
1 actionable task: 1 up-to-date
If you change or delete the file, then Gradle re-runs the task:
$ echo foo > hello.txt

$ gradle cH --console=plain
> Task :createHelloWorld

BUILD SUCCESSFUL in 526ms
1 actionable task: 1 executed

$ cat hello.txt
Hello world
If you want Gradle to disregard up-to-date checks, you can force tasks to execute with
--rerun-tasks.
Normally, a task would actually read some files, i.e. it would have inputs as well as outputs.
As an example, let’s create a task that reads a name from a file, then creates another file with a creative greeting:
Hello <name>!
The generated file should go inside Gradle’s
buildDir(which is a pre-defined project variable) to make sure all build artifacts are separate from sources. By default, that’s thebuild/directory, but you can change it if you want. All Gradle plugins will put their artifacts insidebuildDir.
def nameFile = file('name.txt')
def helloFile = file(buildDir, 'hello.txt')
task createGreeting {
    inputs.files(nameFile)
    outputs.files(helloFile)
    doLast { helloFile.write("Hello ${nameFile.text}") }
}
$ echo 'Joe' > name.txt

$ gradle cre --console=plain
> Task :createGreeting

BUILD SUCCESSFUL in 561ms
1 actionable task: 1 executed

$ cat build/hello.txt
Hello Joe
Pretty easy! If you change the name and re-run the build, Gradle will re-create the output file with the new name. If you don’t change the inputs nor the outputs, then Gradle will know to skip the task.
You can add as many tasks as you want, introduce complex relationships between them, add descriptions to them and many other things.
Here’s a simple demonstration:
def nameFile = file('name.txt')
def helloFile = file(buildDir, 'hello.txt')
task createGreeting {
    inputs.files(nameFile)
    outputs.files(helloFile)
    doLast { helloFile.write("Hello ${nameFile.text}") }

    // add a description so the command "gradle tasks" shows a nice
    // summary of all tasks in this project with descriptions
    description = 'Creates a greeting file'

    // grouping tasks also improves the tasks reports
    group = 'info'
}

task foo {
    description = 'the foo task'
    group = 'info'
}

task bar {
    description = 'a bar task'

    // this task will always require running 'foo' as a pre-requisite
    dependsOn 'foo'

    // this task will run only after 'greeting' is done,
    // but does not require 'greeting' to run
    mustRunAfter 'greeting'

    group = 'info'
}
You can also declare tasks that use an existing Task implementation. For example, we could use the Copy
task like this:
task copyDocs(type: Copy) {
    from 'src/doc'
    into "${buildDir}/doc"
}
Some other useful tasks Gradle offers out-of-the-box are:
Exec- executes a CLI command.JavaExec- executes a Java application.Delete- deletes files and directories.Tar- tars files and directories.Sync- synchronizes the contents of directories.
There are many more (look at the Task Types menu in any of the above docs), and you can write your own tasks in any JVM
language similarly to how you can write your own plugins… we’ll see how to do that soon!
I like the way Gradle manages tasks so much that I wrote a similar task runner in Dart called Dartle. If you use Flutter and enjoys Gradle, maybe you should check it out.
Gradle as a package manager
The second most useful feature of Gradle, after running tasks, is its package management support.
I find the way package management works in Gradle the most elegant of any package manager I’ve used.
Here’s how it works…
Before you define any dependency, you need two things:
- repositories - where the dependencies can be found.
- configurations - groups of dependencies used for a certain purpose (e.g.
implementationandtestImplementation).
Repositories
Gradle Repositories can be of three types:
- Maven - a format popularized by the most common Java build system, Apache Maven.
- Ivy - Apache Ivy is the dependency manager normally used with Ant, a kind of Maven’s (and Gradle’s) predecessor.
- Flat directories - use the local file system (for when you use other tools to download packages).
Maven is by far the most common package repository type in the Java world. There are at least 3 large public Maven repositories available:
- Maven Central - probably the biggest repository of Java/JVM libraries.
- JCenter - an alternative repository by JFrog Bintray.
- Google - the Google version, mostly used for Android.
To use all of the above (so dependencies will be searched for in all three), just add this to your build file:
repositories {
    mavenCentral()
    jcenter()
    google()
}
You can also use a private (or alternative) repository, if you have one:
repositories {
    maven {
        url "http://repo.mycompany.com/maven2"
    }
}
Configurations
Configurations are, in essence, groups of dependencies. Most other build systems tend to hardcode only two “configurations”, compile-time dependencies and test dependencies.
For example, npm uses dependencies and devDependencies.
Rust’s Cargo has dependencies, dev-dependencies,
but also build-dependencies and the concept of target.cfg which is not too different from Gradle’s configurations!
Anyway, in Gradle, a project can have many configurations. Programming language plugins will usually add the following configurations to projects they are applied on:
implementation- internal dependencies required to compile the project.compileOnly- dependencies only required at compile time (things like Java annotation processors’s dependencies).runtimeOnly- only required at runtime, not visible at compile-time (e.g. slf4j logger implementations).
Plus, the equivalent test configurations:
testImplementationtestCompileOnlytestRuntimeOnly
Check the Java Plugin Configurations for a complete list of common configurations used in Gradle projects.
You can create your own configurations:
configurations {
    // a simple config
    browserTest
    // a config that extends from another config
    browserTestRuntime.extendsFrom browserTest
}
Once you have a configuration, you can add dependencies to it.
// always add at least one repository to find dependencies on
repositories {
    jcenter()
}
configurations {
    implementation
    testImplementation
    testRuntimeOnly
}
// project dependencies are grouped by configuration
dependencies {
    implementation 'com.google.guava:guava:30.0-jre'
    testImplementation "org.junit.jupiter:junit-jupiter-api:5.7.0"
    testRuntimeOnly "org.junit.jupiter:junit-jupiter-engine:5.7.0"
}
Each dependency may bring in transitive dependencies with it. You can turn that off, or exclude particular transitive dependencies, as shown below:
dependencies {
    implementation 'com.google.guava:guava:30.0-jre', {
        // exclude a single transitive dependency
        exclude group: 'org.checkerframework', module: 'checker-qual'
    }
    testImplementation "org.junit.jupiter:junit-jupiter-api:5.7.0"
    testRuntimeOnly "org.junit.jupiter:junit-jupiter-engine:5.7.0", {
        // do not download any transitive dependency at all for this artifact
        transitive = false
    }
}
Dependency Management in Gradle can get extremely complex (it has to be because of the bad modularity story of the JVM, which even after Java 9 still ignores module versioning!), but only knowing what’s been shown above will get you really far. If you want to know all the powerful mechanisms Gradle lets you use to control dependencies, check the Dependency management in Gradle docs.
To see the project’s full dependency tree, run gradle dependencies:
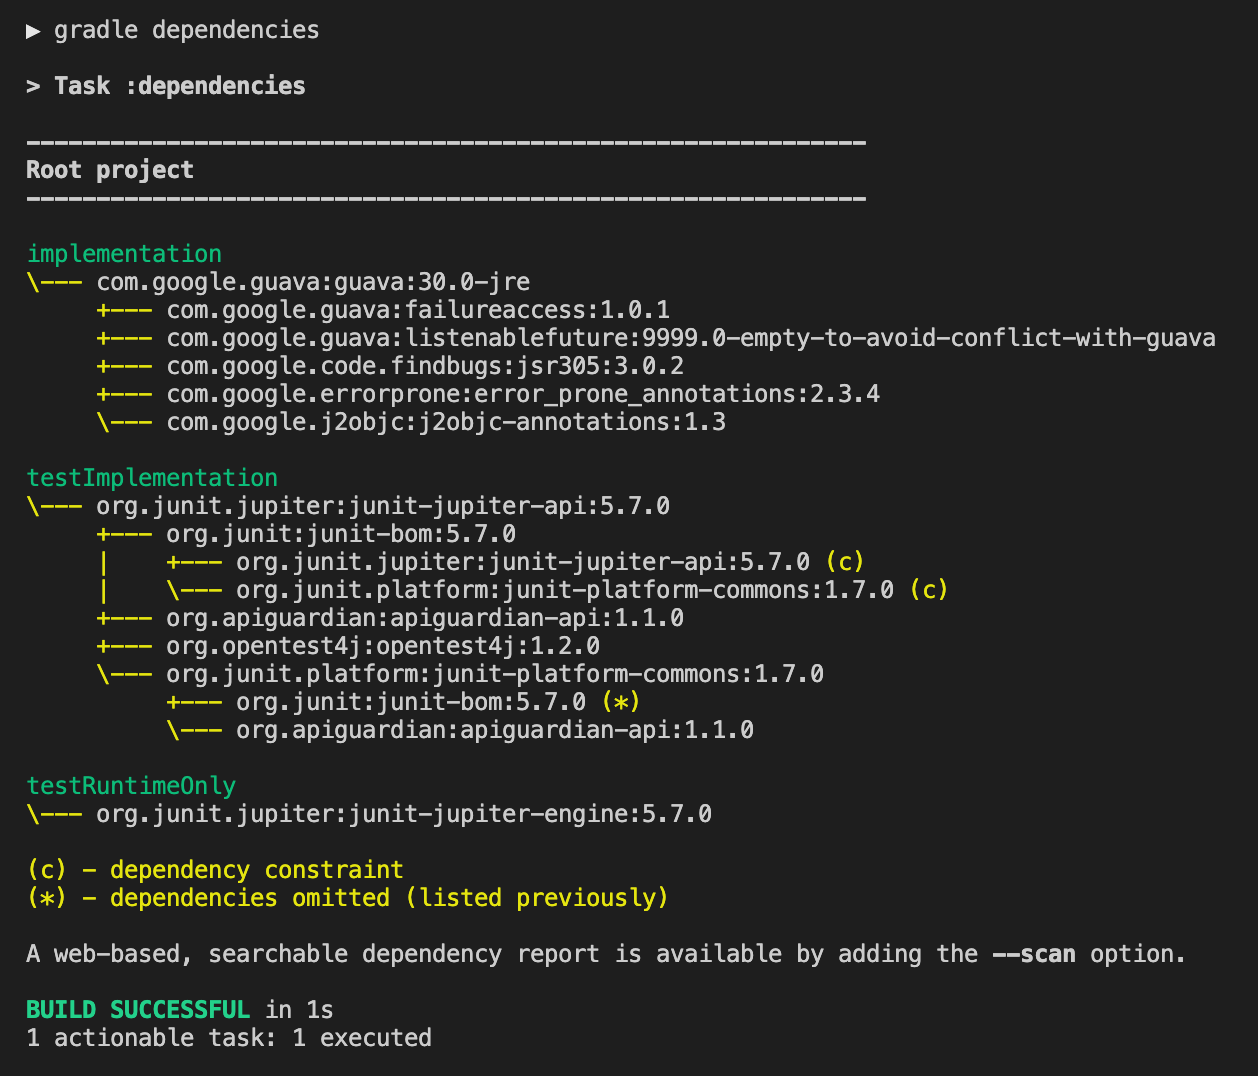
Without a plugin to make use of configurations, they are pretty useless. But you can still use them to download the actual artifacts (usually Java jars) and copy them to a local directory, for example:
task downloadImplementationDependencies(type: Copy) {
    description 'Downloads implementation dependencies'
    from configurations.implementation
    into file("$buildDir/dependencies")
}
Running the above task:
$ gradle download

BUILD SUCCESSFUL in 1s
1 actionable task: 1 executed

$ ls build/dependencies
error_prone_annotations-2.3.4.jar       j2objc-annotations-1.3.jar
failureaccess-1.0.1.jar                 jsr305-3.0.2.jar
guava-30.0-jre.jar                      listenablefuture-9999.0-empty-to-avoid-conflict-with-guava.jar
Normally, configurations are defined by plugins and you only define which dependencies each configuration should have for your project.
The Plugins will then use the dependencies to compile, test, examine and run your code.
Declarative builds
You may have noticed that I started off by writing the implementation of a task (createGreeting) right into the
build file. This is not what you should normally do in a Gradle build.
Build files should look declarative: they should only be used to configure the build!
Having a proper language to write build configuration is great, though, because variables and conditionals are guaranteed to be required at some point, and trying to use a custom-made, limited DSL for this kind of thing in a data-only language instead of using a language designed to do that and with which users are already familiar is an extremely poor replacement.
I just wanted to show the basics of Gradle’s task running mechanism with that example before introducing plugins.
To make builds more declarative and powerful, instead of creating tasks manually, we can just use, or create, plugins that add tasks and their configuration to our build automatically.
Let’s start with using a Gradle plugin. After that, we’ll see how it’s very easy to create our own Gradle plugin for those very specific tasks for which no generic solution exists (like creating a greeting message - or does it? 🤓).
Using existing plugins
Most Gradle users don’t need to implement their own tasks or create configurations because there are thousands of plugins already available to do nearly everything you can imagine.
You can go to https://plugins.gradle.org to search for one, or use one of the many Core Gradle Plugins!
The most common Gradle plugin is probably the Java plugin, which adds support for building Java projects in Gradle (that’s right, Java is not available by default in Gradle projects, almost everything not related to running tasks and getting dependencies is done via plugins). Hence, it makes sense to use it as an example of how to make use of a Gradle plugin, so let’s have a look at it.
Using the Java Plugin
To use the Java plugin, you only need to declare a plugins block like this:
plugins {
    id 'java'
}
Once you’ve added that to your build file, a lot of things happen:
- several tasks are added to the project, including
compileJava,compileTestJava,jaretc. mainandtestsourceSets are created, referring tosrc/main/javaandsrc/test/javarespectively.- dependency configurations are created for grouping dependencies (as we saw earlier).
- the
javaextension is added to allow configuring the Java compiler and toolchain. - several convention properties like
reportsDiranddocsDirare added to the project.
Lots of new concepts here! The Java plugin is used by most developers interacting with Gradle, and it’s quite complicated, for sure, which I think is what causes most complaints about Gradle being so complex!
To complicate things a little more, there’s also an extension of the Java plugin, the java-library plugin, specifically meant to be used by Java libraries as opposed to applications. All it does as far as I can tell is add a new
apiconfiguration (and derived configurations and tasks), which declares the re-exported dependencies of a project (more or less like the older, deprecatedcompileconfiguration used to do).
However, notice that this complexity is not really inherent to Gradle. One could easily create a simpler Java plugin to eliminate most complexity by dropping support to certain advanced use cases and adding few more conventions [1].
In any case, to truly understand the Java Plugin as well as most other language plugins, as they’re all based on the Java plugin’s concepts, it’s necessary to understand sourceSets and their relationship to dependency configurations.
SourceSets are directories containing source code and application resources, and are associated with a few configurations (the source code’s dependencies) to form a compilation unit.
Each sourceSet has three configurations associated with it:
- compile classpath
- annotation processor’s classpath
- runtime classpath
The Java plugin creates two sourceSets, main and test, and you can add more.
The diagram below shows the relationship between the sourceSets, classpaths and dependencies configurations:
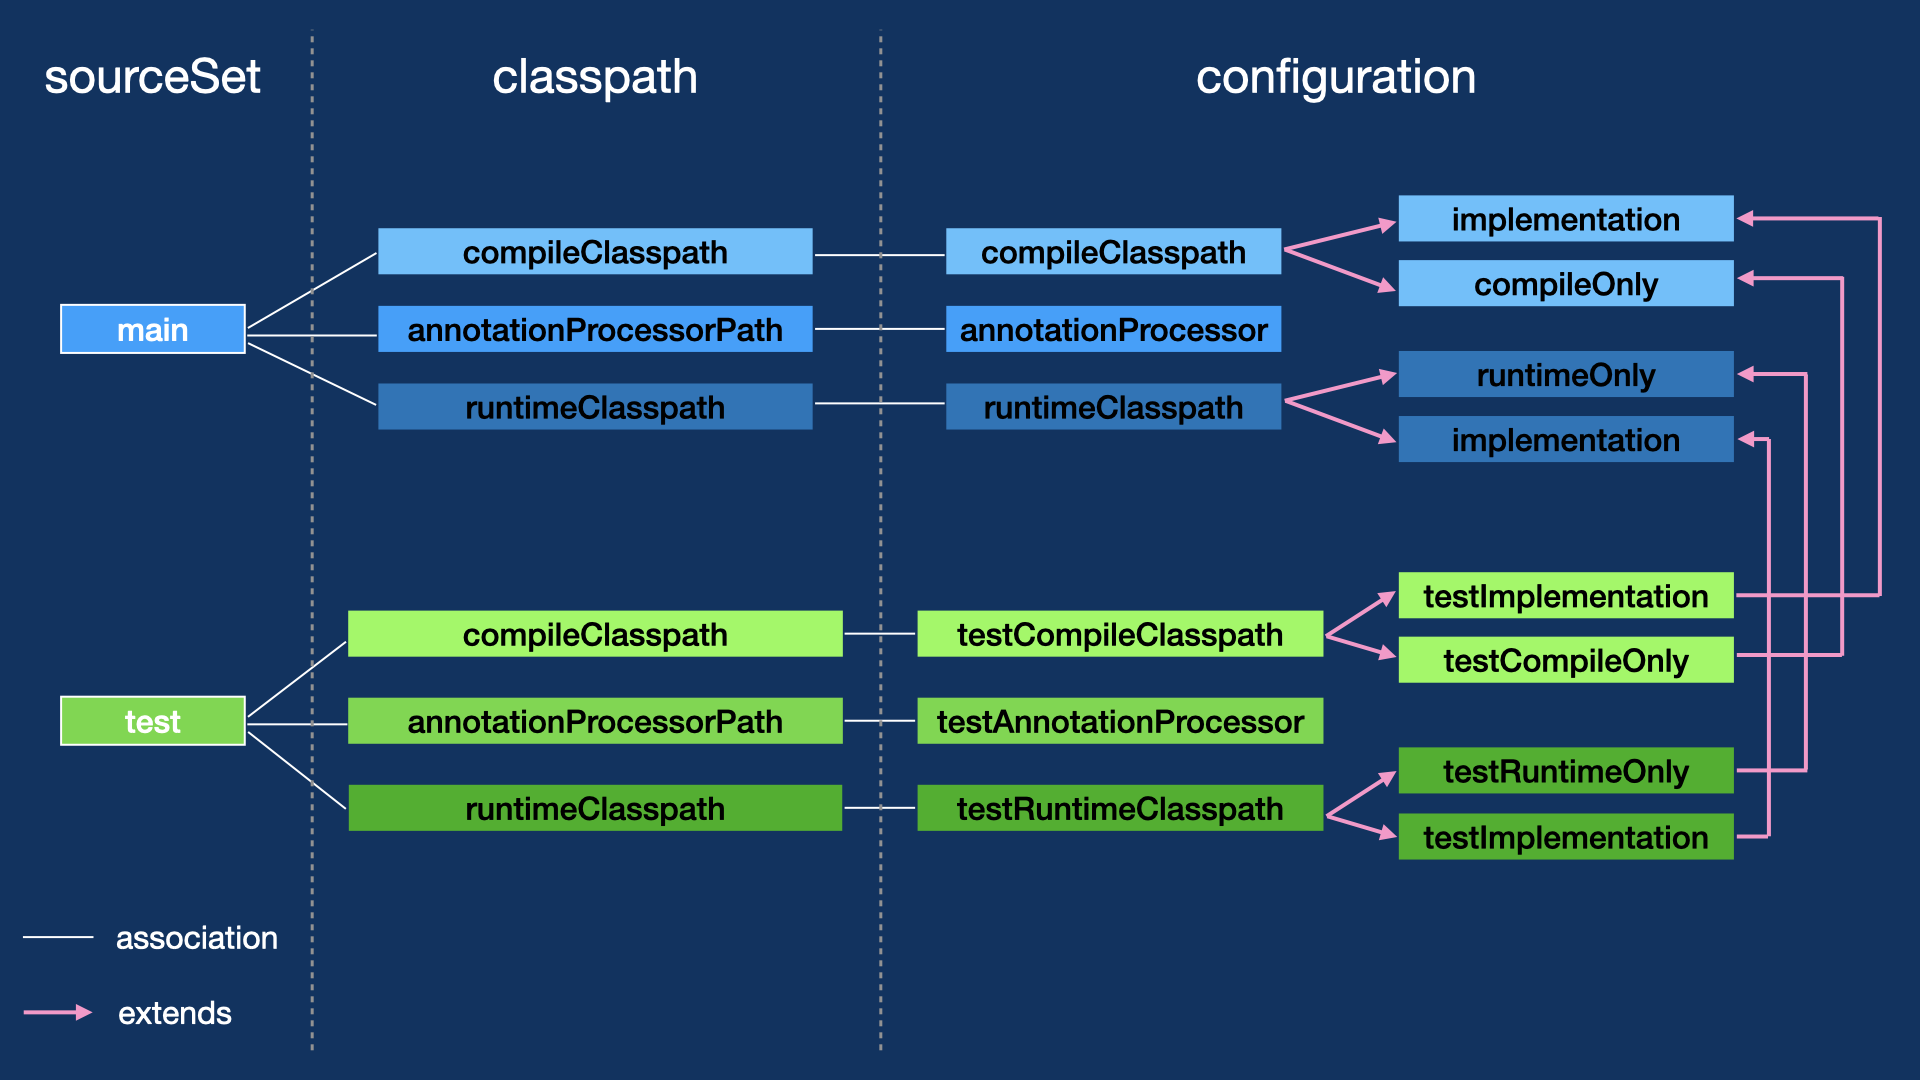
Notice how the test sourceSet mimicks the main sourceSet. Whereas the main sourceSet’s compileClasspath is
associated with the compileClasspath configuration,
the test sourceSet’s compileClasspath refers to the testCompileClasspath.
For each configuration used by the main sourceSet, just add test in front of it and you know which configuration
is associated with the equivalent test sourceSet.
The Java Plugin also creates relevant tasks for each sourceSet, most importantly a task to compile the sourceSet.
To compile the main sourceSet, you can just run the compileJava task. To compile the test sourceSet, you can
run the compileTestJava task. A custom sourceSet called, say, intTest, would be compiled with compileIntTestJava.
To fully understand how the Java Plugin associates sourceSets, configurations and tasks, have a look at this document which explains it in more detail.
In fact, to add support for integration tests that run independently of unit tests, you need to add your own sourceSet as explained here.
Creating a Java build
Now that we finally understand the Java Plugin well enough to use it with confidence, let’s create a Java build.
Here’s a very simple build file for a Java project:
plugins {
    id 'java'
}
group = 'com.athaydes.examples'
version = '0.1.0-SNAPSHOT'
sourceCompatibility = JavaVersion.VERSION_11
Add some Java classes to the src/main/java directory (the default main source set), then compile it by running:
$ gradle compileJava
You can find your class files at build/classes/java/main/.
To package the class files into a jar, run:
$ gradle jar
This creates a jar inside the build/libs directory.
Using external dependencies
If you decide to add dependencies to your project, you might want to copy the dependencies to the same directory where your jar goes so that you can easily bootstrap your application.
For example, change the build file to look like this:
plugins {
    id 'java'
}
group = 'com.athaydes.examples'
version = '0.1.0-SNAPSHOT'
sourceCompatibility = JavaVersion.VERSION_11

repositories {
    jcenter()
}
dependencies {
    implementation 'com.google.guava:guava:30.0-jre'
}
task copyLibs(type: Copy, dependsOn: jar) {
    from configurations.runtimeClasspath
    into file("$buildDir/libs")
}
Let’s use Guava in our main class, just for fun:
import com.google.common.collect.*;
class Hello {
    public static void main(String... args) {
        var inventory = ImmutableMap.of("coin", 3, "glass", 4, "pencil", 1);
        System.out.println("Your inventory: " + inventory);
    }
}
Now, packaging our app with dependencies and all is as simple as:
$ gradle copyLibs
You can now execute the Java class in the command-line:
$ java -cp "build/libs/*" Hello
Your inventory: {coin=3, glass=4, pencil=1}
Deploying the application as a “fat” jar
If you prefer to use a fat jar (i.e. a single jar that includes all its dependencies and can be run directly), unfortunately, despite it being so common in the Java world, the Java plugin does not offer that functionality natively… however, it’s not too hard to use the Gradle DSL to implement it ourselves.
Add the following task to the build:
task fatJar(type: Jar, dependsOn: copyLibs) {
    manifest {
        attributes 'Main-Class': 'Hello'
    }
    from {
        file("$buildDir/libs").listFiles().collect { zipTree(it) }
    }
    destinationDir buildDir
}
We added one line of “logic” above in order to collect all jars into the fat jar. Because the code is so simple, this normally doesn’t bother me, but if you feel bad doing this, you can use an existing plugin to do it for you. See this Baeldung Guide for some alternatives.
Now, build then run the fat jar with:
$ gradle fat

BUILD SUCCESSFUL in 1s
4 actionable tasks: 4 executed

$ java -jar build/hello-0.1.0-SNAPSHOT.jar
Your inventory: {coin=3, glass=4, pencil=1}
Build task sequence and cleanup
To delete all build artifacts, run the clean task:
$ gradle clean
The usual task sequence for simple Java (and similar languages, like Kotlin, Scala and Groovy, just replace Java in
the task Name with the other language name) projects is as follows:
> Task :compileJava
> Task :processResources
> Task :classes
> Task :jar
> Task :assemble
> Task :compileTestJava
> Task :processTestResources
> Task :testClasses
> Task :test
> Task :check
> Task :build
If you want one of your own tasks to be part of the default task, build, you can plug it in at the right place…
Add this at the end of your build file, for example:
build.dependsOn fatJar
Now, running the build task again, we would see our tasks as well:
...
> Task :check UP-TO-DATE
> Task :copyLibs UP-TO-DATE
> Task :fatJar UP-TO-DATE
> Task :build UP-TO-DATE
Creating local Gradle plugins
Gradle has the concept of a buildSrc directory where you can create build utilities (e.g. helper functions), tasks,
or even implement a small plugin
of sorts just for use by your own Gradle project. If the plugin turns out to be useful,
you can easily pull it out of the project make it a proper Gradle plugin that can be published and used by anyone!
Once you have this simple tool under your belt, you can remove, in principle, all logic from your build.
Let’s create a plugin to replace our initial createGreeting task and make that configurable!
We’ll need to create a new directory called buildSrc, then create within it a Gradle Project with a Plugin that provides
the createGreeting task that was used in the previous example.
Notice that the buildSrc directory contains a full-blown Gradle Project - you can have tests and everything.
Gradle plugins can be written in any JVM language. I’m a fan of Groovy for simple I/O tasks, so here’s what I would do in this case…
Create the file buildSrc/build.gradle:
plugins {
    id 'groovy'
}
repositories {
    jcenter()
}
sourceSets.main.groovy.srcDirs("src")
The build file above declares this to be a Groovy project (because it includes the groovy plugin)
and includes the JCenter repository for resolving dependencies.
Notice that, in the last line of the build file, I changed the main sourceSet’s source directory to simplify the
project layout. Instead of using the default src/main/groovy directory for Groovy code, I can just put the code in
the src dir instead.
Create the file buildSrc/src/GreetingPlugin.groovy:
import org.gradle.api.*
import org.gradle.api.tasks.*

class GreetingPlugin implements Plugin<Project> {
    void apply(Project project) {
        project.extensions.create('greeting', GreetingPluginExtension)
        project.tasks.create("createGreeting", CreateGreetingTask) {
            group = 'build'
            description = 'Creates a greeting file'
        }
    }
}

class GreetingPluginExtension {
    File nameFile
    File greetingFile
}

class CreateGreetingTask extends DefaultTask {

    @InputFile
    File getNameFile() { project.extensions.greeting.nameFile }

    @OutputFile
    File getGreetingFile() { project.extensions.greeting.greetingFile }

    @TaskAction
    void go() {
        greetingFile.write("Hello ${nameFile.text.trim()}!")
    }
}
That’s all the code we need for our plugin!
To use it in your build file (now we’re back to the main project, so this is not inside buildSrc/!) it’s easy:
apply plugin: GreetingPlugin

greeting {
    nameFile = file('name.txt')
    greetingFile = file("$buildDir/hello.txt")
}
There you go. Run the createGreeting task now and you should find build/hello.txt ready with the perfect greeting
message.
Multi module builds
One last thing that’s extremely useful to understand Gradle is how to create multi-module builds.
With JPMS, the Java Module System, finally becoming mainstream, knowing how to split up projects into modules has become even more important than before.
The first step to create a multi-module Gradle project is to actually define the initial modules composing our application. As an example, let’s create a project with 3 modules:
example-api- the API shared by all modules.example-core- the “core” application.example-in-memory-data- an in-memory data provider.
The third module assumes we will have some kind of data provider that could be replaced later with other implementations (e.g. a database provider), which is a fairly realistic scenario in modular applications.
In general, each module should live in its own directory. Gradle doesn’t dictate the file structure, but it does assume some defaults which are quite intuitive.
If we simply use one sub-directory per module, for example, things will work with the Gradle defaults.
Let’s get to work:
$ mkdir -p {example-api,example-core,example-in-memory-data}/src/main/java/example
$ touch build.gradle settings.gradle
The settings.gradle file, at the root directory, is used by Gradle to find modules.
Add the following contents to it to tell Gradle about our modules:
rootProject.name = 'gradle-multi-java-modules-sample'

include 'example-api', 'example-core', 'example-in-memory-data'
Now, we have two choices: to put all information about each module in their own build.gradle files,
or to have a top-level build.gradle file in the root directory which configures each module.
I’ve seen both being used, but probably, the most common approach is to mix the two: some basic, common functionality
is added to all modules from the top-level build file, and module-specific stuff is declared in the respective
build file (e.g. example-api/build.gradle).
In Gradle terminology, modules are represented with
subProjects, which are slightly more generic than modules.
As all our modules will be written in Java, we may want to declare that in the top-level build.gradle file:
subprojects {
    apply plugin: 'java'
    java {
        modularity.inferModulePath = true
    }
    sourceCompatibility = JavaVersion.VERSION_11
}
You may have noticed that when adding plugins via
subProjectsyou cannot use theplugins {}block as you would normally do. That’s why I didapply plugin: 'java', which uses the older syntax to add plugins to a build. The reason for this is that Gradle has been trying to change things to make them run faster over time… quite a bit of complexity you’ll see in Gradle, like this wart, is a result of that misguided, in my opinion, effort.pluginsblocks are very special in Gradle because they can completely change a build. Allowingpluginsblocks anywhere makes it impossible to optimise a build effectively, so they limit where you can add them. Well, but you can useapply pluginsyntax anyway, which has the same issue but cannot be similarly restricted by Gradle now as it would break more than half its ecosystem! For that reason, the recommended but way too complex way Gradle now recommends you do this kind of thing is by using convention plugins. If you usegradle initto create a multi-module application, you can see how that’s done. I decided to show the old way,subprojects, in this post, because it’s currently way more common to find projects using that… also, I find it a great deal simpler than the alternative.
The modularity.inferModulePath = true line is required for the Java Plugin to enable JPMS support
as it’s not (yet?) enabled by default.
The example-api module doesn’t even need a build.gradle file because the defaults added in the top-level build
file are enough for it.
The example-in-memory-data module needs a build.gradle file to declare its dependency on example-api.
Here’s what the example-in-memory-data build file should look like:
dependencies {
    api project(':example-api')
}
We use the api configuration because this module exposes the example-api’s API in its own API.
For the same reason, the module-info.java file for example-in-memory-data should use
require transitive when requiring the example-api module (whose Java name is example.api):
import example.PersonDataStore;
import example.memory.InMemoryPersonDataStore;

module example.memory {
    requires transitive example.api;
    provides PersonDataStore with InMemoryPersonDataStore;
}
The example-core module should import dependencies using the implementation configuration instead, because it’s not designed
to share anything with other modules, it’s an application, after all.
Therefore, example-core’s build.gradle file should look like this:
dependencies {
    implementation project(':example-api')
}
It has only one dependency, on the example-api module, because the implementation of the service it uses will be
dynamically loaded at runtime (so any implementation can be used at runtime).
And its module-info.java looks like this:
import example.PersonDataStore;

module example.core {
    requires example.api;
    uses PersonDataStore;
}
The
usesclause above is part of the simpleServiceLoadermechanism, which makes it possible to keep consumer modules dependent on only API modules, while implementation modules can be dynamically loaded at runtime, providing alternative implementations.
The Java sources are not important, but if you want to see them, they’re available in this GitHub repository and below.
Example Application - click to see the example Java source code
API Module
example-api/src/main/java/module-info.java
module example.api {
    exports example;
}
example-api/src/main/java/example/Person.java
package example;

public class Person {
    private final String name;

    public Person( String name ) {
        this.name = name;
    }

    public String getName() {
        return name;
    }

    @Override
    public String toString() {
        return "Person{" +
                "name='" + name + '\'' +
                '}';
    }
}
example-api/src/main/java/example/PersonDataStore.java
package example;

import java.util.Optional;

public interface PersonDataStore {
    Optional<Person> getPerson( String id );
}
In-Memory-Data-Store Module
example-in-memory-data/src/main/java/module-info.java
import example.PersonDataStore;
import example.memory.InMemoryPersonDataStore;

module example.memory {
    requires transitive example.api;
    provides PersonDataStore with InMemoryPersonDataStore;
}
example-in-memory-data/src/main/java/example/memory/InMemoryPersonDataStore.java
package example.memory;

import example.Person;
import example.PersonDataStore;

import java.util.Map;
import java.util.Optional;

public final class InMemoryPersonDataStore implements PersonDataStore {
    private final Map<String, Person> personById = Map.of( "joe", new Person( "Joe Doe" ) );

    @Override
    public Optional<Person> getPerson( String id ) {
        return Optional.ofNullable( personById.get( id ) );
    }
}
Core Module
example-core/src/main/java/module-info.java
import example.PersonDataStore;

module example.core {
    requires example.api;
    uses PersonDataStore;
}
example-core/src/main/java/example/core/App.java
package example.core;

import example.PersonDataStore;

import java.util.ServiceLoader;

public final class App {
    public static void main( String[] args ) {
        if ( args.length != 1 ) {
            throw new IllegalArgumentException( "Please provide one argument exactly: " +
                    "the ID of the person you want to find" );
        }
        var personId = args[ 0 ];
        var personDataStore = loadPersonDataStore();
        personDataStore.getPerson( personId ).ifPresentOrElse(
                ( person ) -> System.out.printf( "Found Person with ID=%s: %s\n", personId, person ),
                () -> System.err.printf( "Person does not exist with ID=%s\n", personId ) );
    }

    private static PersonDataStore loadPersonDataStore() {
        var stores = ServiceLoader.load( PersonDataStore.class );
        for ( var store : stores ) {
            return store;
        }
        throw new IllegalStateException( "No " + PersonDataStore.class.getName() + " service available" );
    }
}
Finally, to compile everything all you need to do is run gradle build.
If you want to run and distribute a modular Java application, you need to collect all the runtime jars in a directory, similarly to how we did when we created a fat jar earlier.
Add these tasks to the top-level build.gradle file:
task createModulePath(type: Copy) {
    def runtimeModules = [
            project(':example-api'),
            project(':example-in-memory-data'),
            project(':example-core'),
    ]
    runtimeModules.each { module ->
        dependsOn module.jar
        from module.jar
        from module.configurations.runtimeClasspath
    }
    into file("$buildDir/mods")
}

task clean(type: Delete) {
    delete buildDir
}
Run gradle createModulePath to put all runtime jars into the build/mods directory.
Finally, run the application:
$ java --module-path=build/mods --module=example.core/example.core.App joe
Found Person with ID=joe: Person{name='Joe Doe'}
Conclusion
Gradle is a very powerful build system, with a fairly small and simple, but advanced core system. Thanks to it, plugins can do just about anything.
Unfortunately, the Java plugin, as most things related to Java tooling, ended up becoming overly complex and, because it is what most developers interact with (directly or indirectly - even if you only use Kotlin or Scala, most Java plugin conventions and properties apply to your project), Gradle has earned a bad reputation for being opaque and difficult to learn.
Add to that a fairly long history (Gradle has been around for well over a decade) including a large, ultimately
failed attempt at re-designing itself as a rule-based
system, several semi-deprecated but widely used features (apply plugin, subprojects) which damage performance,
and, prepare for a likely unpopular opinion now, a foolish change of direction with the introduction of the Kotlin
DSL, which served more to fracture the community than anything else [2]
and you end up with quite a few reasons for people to hate it.
I hope this blog post clears the air for suffering Gradle users. Once you understand the Gradle core system, it’s much easier to navigate the rough edges and warps. Perhaps, like me, you might come to even find beauty in it.
Gradle is a little bit like Lisp in this sense: it has a small, simple core that provides just enough basic mechanisms to allow application code, or build files and plugins in the case of Gradle, to go bananas!
Most people hate systems like this because, in the hands of less illuminated artisans, the fruits of their labor may resemble more a big ball of mud than a work of art.
To those who manage the tame the beast, however, it is an unparalleled tool to create and build the greatest software.
Footnotes:
[1] The reason there’s no popular alternative to the Java plugin, as far as I know, has to do with the surrounding tooling, like IDEs, which need to be able to recognize the plugin and use its configuration to set itself up.
[2]
They could’ve added @CompileStatic support to the Groovy DSL and get approximately ALL benefits of using Kotlin
with none of the huge added complexity in implementation and related tooling - see the Jetbrains arduous, ongoing
fight to get it to work in IntelliJ with acceptable performance.
I am still waiting for that effort to work, as at least for me, it’s still unacceptably slow.